应用权限设计规范
权限代码定义
权限定义
以用户操作职员数据为例,矩阵横向列出用户的相关操作,纵向列出用户对应的权限,如下图:
| 用户权限/用户操作 | 权限代码 | 创建 | 删除 | 编辑 | 访问 | 启用/停用 | 下载 |
|---|---|---|---|---|---|---|---|
| 全部权限 | employee | ✓ | ✓ | ✓ | ✓ | ✓ | ✓ |
| 创建权限 | employee.create | ✓ | |||||
| 删除权限 | employee.delete | ✓ | |||||
| 编辑权限 | employee.update | ✓ | |||||
| 访问权限 | employee.query | ✓ | |||||
| 启用/停用权限 | employee.toggle | ✓ | |||||
| 下载权限 | employee.download | ✓ |
在定义权限时要按最小颗粒度划分,保证权限的灵活性与可扩展性。并按需求在前端画面进行合并。
权限代码定义
命名规范
- 权限代码由领域代码和操作代码组成分为两部分,操作代码可省略
- 中间使用固定的连字符连接,领域代码和操作代码由英文、数字、横线构成
通用格式:<领域代码>.<create|delete|update|query|toggle|...>
例如:employee、employee.delete、employee.update、employee.toggle
拆分原则
- 权限定义时按最小颗粒度定义
- 根据系统需求适当在画面上进行合并
以用户操作职员数据为例
- 系统要求权限划分颗粒度比较细时可以将页面展示名称可权限一一对应,例如:
| 页面展示名称 | 权限名称 | 权限代码 |
|---|---|---|
| 全部 | 全部权限 | employee |
| 创建 | 创建权限 | employee.create |
| 删除 | 删除权限 | employee.delete |
| 编辑 | 编辑权限 | employee.update |
| 访问 | 访问权限 | employee.query |
| 启用/停用 | 启用/停用权限 | employee.toggle |
| 下载 | 下载权限 | employee.download |
- 系统要求权限划分颗粒度不是很细,可以适当合并部分权限, 例如:
| 页面展示名称 | 权限名称 | 权限代码 |
|---|---|---|
| 全部 | 全部权限 | employee |
| 编辑 | 创建权限 | employee.create |
| 删除权限 | employee.delete | |
| 编辑权限 | employee.update | |
| 访问 | 访问权限 | employee.query |
| 启用/停用 | 启用/停用权限 | employee.toggle |
| 下载 | 下载权限 | employee.download |
查看权限 为最基础的权限,任何权限都可以包含 查看权限,所有在页面交互上,建议当有权限被选中时,查看权限也同时被勾选。
后台权限控制实施方式 (Spring Security)
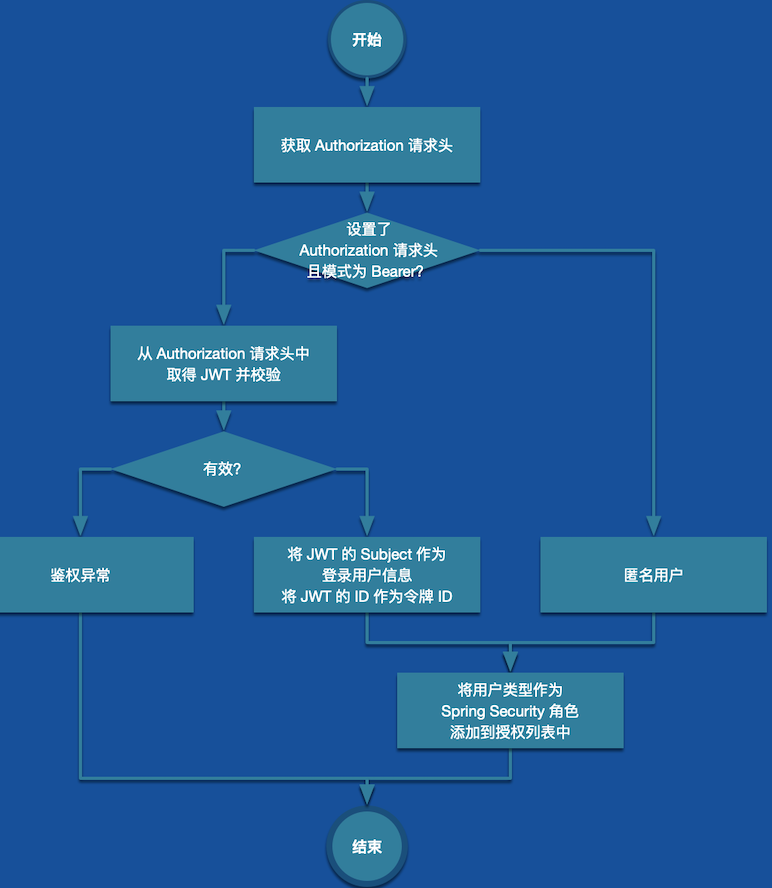
JWT Token Filter
自定义 Filter 在用户登录时判断用户是否有访问权限,如果有访问权限将用户类型作为Spring Security角色添加到授权列表中,具体业务流程如下:
REST Controller 添加 @PreAuthorize 注解
为 REST Controller 添加对应的 @PreAuthorize 注解,并设置调用所需的权限表达式从而控制一个方法是否能够被调用
    // 用户在当前机构下为 ADMINISTRATOR 角色时可以调用该接口
    @Override
    @IncludeReferenceEntities
    @PreAuthorize("hasRole('ADMINISTRATOR')")
    @Operation(
        summary = "管理员创建职员",
        description = "不可同时设定 <code>userId</code> 和 <code>userCredential</code>。"
            + "新用户时必须设置登录密码。仅系统管理员拥有访问权限。"
    )
    public EmployeeCommandEntity create(@Valid TenantEmployeeCreateDTO employeeCreateDTO) {}

    // 用户在当前机构下对于员工拥有所有操组权限时可以调用该接口
    @Operation(summary = "创建职员", description = "所需权限:<code>employee</code>。")
    @PreAuthorize("hasPermission(#tenantId, 'employee')")
    public EmployeeCommandEntity create(@Parameter(description = "租户") String tenantId, @Valid EmployeeCreateDTO createDTO) {}

    // 用户在当前机构下对于员工拥有编辑权限时可以调用该接口
    @Operation(summary = "更新职员", description = "所需权限:<code>employee.update</code>。")
    @PreAuthorize("hasPermission(#tenantId, 'employee.update')")
    public void update(@Parameter(description = "租户") String tenantId,
                       @Parameter(description = "实体 ID") String employeeId,
                       @Parameter(description = "修订版本号") Long revision, @Valid EmployeeUpdateDTO updateDTO) {}
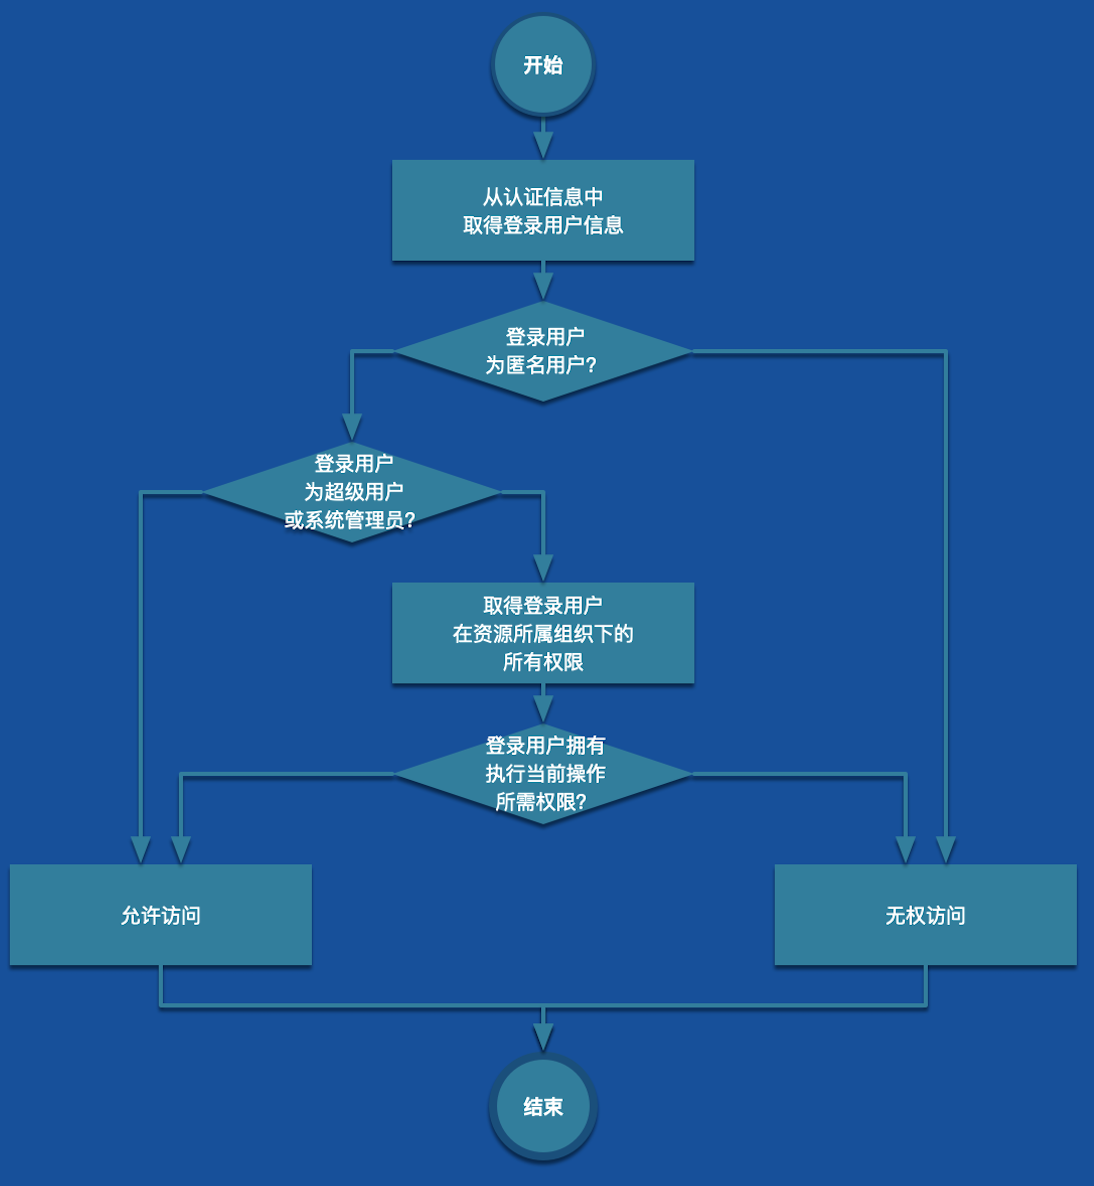
实现 Permission Evaluator
完善 @PreAuthorize 注解中的hasPermission方法。通过该方法判断用户是否有权操作,具体业务流程如下:
前端权限控制实施方式
权限获取流程

自定义 Authorization Handler
定义通用的方法判断是否有权限访问
  /**
   * 判断是否有权限
   */
  hasPrivilege(targets?: PrivilegeType[]): boolean {
      // 通过获取权限对比返回对应的布尔值
  }
菜单权限实施方案
通过在菜单数据中添加权限代码, 再使用统一得过滤函数,在生成菜单的过程中判断当前菜单项对当前用户是否可见。
菜单权限控制策略分为以下两种:
- 全部显示,当用户点击没有授权的菜单时给出提示信息。这种策略可以向用户展示全部功能,方便推广网站。
- 仅显示有授权的菜单。这种策略能够严格控制页面的菜单展示信息,更适用于内部网站使用。
DXSuite 采用第二种方案。
angular 实施方案
1. 路由定义 添加对应路由守护
  // logs-routes.ts
  export const LOGS_ROUTES: Routes = [
  {
    path: '',
    redirectTo: 'operations-logs',
    pathMatch: 'full'
  },
  {
    path: 'operations-logs',
    loadChildren: () => import('../logs/operations-logs/operations-logs.module').then(m => m.OperationsLogsModule),
    data: { title: '系统日志' },
    canActivate: [LogsGuard] // 添加对应路由守护
  }
  ];
2.添加对应页面路由守护,继承DxSuiteRouterGuard基类并添加权限代码
  //  logs.guard.ts
  @Injectable({ providedIn: 'root' })
    export class LogsGuard extends DxSuiteRouterGuard<PrivilegeType> {
      static ROLE_KEY: PrivilegeType[] = [
        // ... 权限代码数组
      ];
    }
3.菜单数据生成函数把路由守护中的数据添加到菜单渲染数据中
  //   map-route-menus.ts
  export function resolveRouteMenus(routes: Routes): NtNavMenu[] {
    return routes.filter(route => !route.redirectTo && route.path !== '**').map(route => {
      // 把守护中定义的权限代码添加到菜单数据中
      const roles = route.canActivate?.map(activate => activate.ROLE_KEY) || [];
      const menu: NtNavMenu = {
        path: route.path,
        data: route.data,
        roles: roles.flat(Infinity) || []
      };

      if (route.children) {
        menu.children = resolveRouteMenus(route.children);
      }
      return menu;
    });
  }
4.定义菜单过滤函数
 // hasPrivilege 为痛哟
 const filter = menu => this.privilegeService.hasPrivilege(menu.roles);
5.渲染菜单
 <ul nz-menu nzTheme="dark" nzMode="inline" [nzInlineCollapsed]="(isCollapsed$ | async)">
    <ng-container *ngFor="let parent of( menus | menuFilter: filter )">
      <!-- 菜单项  -->
    </ng-container>
  </ul>
vue 实施方案
1. 路由定义 在路由meta数据中添加权限代码
export const LOGS_CHILDREN = [
  {
    path: 'operations-logs',
    name: 'OperationsLogs',
    component: RouterView,
    meta: {
      title: '系统日志',
      roleKeys: [
        //... 权限代码数组
      ]
    }
  }
];
2. 定义菜单过滤函数
const filter = (menu: any) => handler(menu.roles);
3.渲染菜单传入菜单数据,传入过滤函数
  <navigator-layout :menus="menus" :filter="filter">
    <!-- 其他布局 -->
  </navigator-layout>
react 实施方案
1.定义菜单数据
  export const LOGS_CHILDREN = [{
    path: '/logs/operations-logs',
    component: AsyncComponent(OperationsLogs),
    meta: {
      title: '系统日志',
      roleKeys: [
        //... 权限代码数组
      ]
    }
  }]
2.定义菜单过滤函数
const filter = (menu: IURoute) => handler(menu.meta?.roleKeys);
3.渲染菜单传入菜单数据,传入过滤函数
   <Menu
    theme="dark"
    mode="inline"
    selectedKeys={ defaultSelectedKeys }
    openKeys={ openKeys }
    onOpenChange={keys => setOpenKeys(keys as string[])}>
      {
        filterRouteMenus(Routes, filter).map((Route: IURoute) => {
          // 输入菜单项
        })
      }
  </Menu>
路由权限实施方案
通过框架提供的路由守护功能实现
angular 实施方案
1.定义路由守护基类, 通过传入的权限代码判断是否允许进入当前页面
  @Injectable()
  export class DxSuiteRouterGuard<T> implements CanActivate {

    constructor(
      private router: Router,
      @Inject(CLORDER_GUARD_HANDLER) protected handler: ClorderGuardHandler<T>
    ) { }

    canActivate() {
      const constructor: { ROLE_KEY: T[] } = this.constructor as never;
      const hasPrivilege = this.handler.hasPrivilege(constructor.ROLE_KEY);
      if(!hasPrivilege) {
        return this.router.createUrlTree(['/']);
      }
      return hasPrivilege;
    }
  }
vue 实施方案
1.定义通用的路由守护从路由meta数据上获取权限代码判断是否允许进入当前页面
  // dxsuite-router-guard.ts
  export default function (to: RouteLocationNormalized, from: RouteLocationNormalized, next: Function) {
    // @ts-ignore
    const hasPrivilege = AuthorizationHandler(to?.meta?.roleKeys); // 判断是否拥有权限
      if (!hasPrivilege) {
        return next('/');
      }
      return next();
  }
react 实施方案
1.定义通用权限组件 AuthRoute 通过组件判断用户是否可以进入当前路由
   const AuthRoute: React.FC<{ isLogin: boolean; exact: boolean; path: string; component: React.FC; redirect?: string; meta: IUMeta }>
    = ({ isLogin, path, exact, component, redirect, meta }) => {
      if (isLogin) {
        if (redirect) {
          // 跳转对应页面
        }
        // 进入页面或跳转无权限页面
      } else {
        // 跳转登录
      }
    };

  export default AuthRoute;
2. 在 Route 组件外包裹 AuthRoute 组件
    Routes.map((route, index) => <AuthRoute
        isLogin={isAuthenticated}
        key={index}
        redirect={route.redirect}
        exact={true}
        path={route.path as string}
        component={ route.component}
        meta={route.meta || {}}/>
      )}
页面控件实施方案
通过定义通用组件或指令实现
angular 实施方案
1.定义通用指令 *withPrivilege,判断页面元素是否显示
  @Directive({
    selector: '[withPrivilege]'
  })
  export class WithPrivilegeDirective {

    constructor(
      private templateRef: TemplateRef<Element>,
      private viewContainer: ViewContainerRef,
      @Inject(CLORDER_GUARD_HANDLER) private codGuardHandler: ClorderGuardHandler<unknown>
    ) { }

    @Input() set withPrivilege(condition: string[]) {
      if (this.codGuardHandler.hasPrivilege(condition)) {
        this.viewContainer.createEmbeddedView(this.templateRef);
      } else {
        this.viewContainer.clear();
      }
    }
  }
2. 在对应页面元素添加 *withPrivilege 指令并传入对应权限代码数组
  <!-- operationsLogsPrivilege 为页面元素显示时所需的权限代码数组 -->

 <a class="small-title" *withPrivilege="operationsLogsPrivilege">通知接收管理</a>
vue 实施方案
1.定义通用指令 v-permissions,判断页面元素是否显示
// permission-directive.ts
export default function <T>(el: Element, binding: PermissionsDirectiveBinding<PrivilegeType>) {
  const permissions = binding.value;
  if (!handler(permissions)) {
    el.classList.add('hide');
  } else {
    el.classList.remove('hide');
  }
}
2. 在对应页面元素添加 v-permissions 指令并传入对应权限代码数组
 <!-- operationsLogsPrivilege 为页面元素显示时所需的权限代码数组 -->

 <router-link v-permissions="operationsLogsPrivilege">
  <MessageOutlined />
  ...
</router-link>
react 实施方案
1.定义通用组件 Authorized,判断页面元素是否显示
// authorized.tsx
const Authorized: React.FC<AuthorizedProps> = ({ children, noMatch, authority, redirect })=> {

  if (!authority || redirect) {
    return children;
  }

  if (handler(authority)) {
    return children;
  }
  return noMatch;
};

export default Authorized;
2. 在对应页面元素外包裹 authorized 指令并传入对应权限代码数组
  // operationsLogsPrivilege 为页面元素显示时所需的权限代码数组

  <Authorized noMatch={null} authority={operationsLogsPrivilege}>
    <Link>...</Link>
  </Authorized>
权限代码使用规则
- 仅包含领域代码的权限代码覆盖所有由相同领域代码及操作代码组成的权限
- 操作代码可使用
*作为通配符,代表匹配任意操作代码(包括无操作代码的权限)